Mixing Hip-Hop is a two part tutorial course from Matthew Weiss. (Snoop, Arrested Development, Gorilla Zoe, Royce Da 5'9 and more) This course is a simple to follow and easy to digest, the perfect way for the beginner to get their hands dirty in the world of urban music production and recording. The tutorial is broken down into two parts; one half focused on recording/processing rap vocals and another half on hip hop beat production.
Check out this Video Review from: SoundsAndGear.com
Topics Covered:
-Cleaning up vocals
-Controlling tone and dynamics
Enhancing with EQ
-Constructing ambience
-Producing better vocals
-Setting levels
-Emotional automation
-Making the drums hit hard
-Enhancing the synths
-Home mastering tips
The entire cost of the tutorial kit is $57 USD and it can be downloaded directly from the Mixing Hip-Hop website.
All the best,
Nick
Showing posts with label Tutorials. Show all posts
Showing posts with label Tutorials. Show all posts
Saturday, April 19, 2014
Monday, July 18, 2011
Harmonic Distortion Tutorial Video from Samplecraze
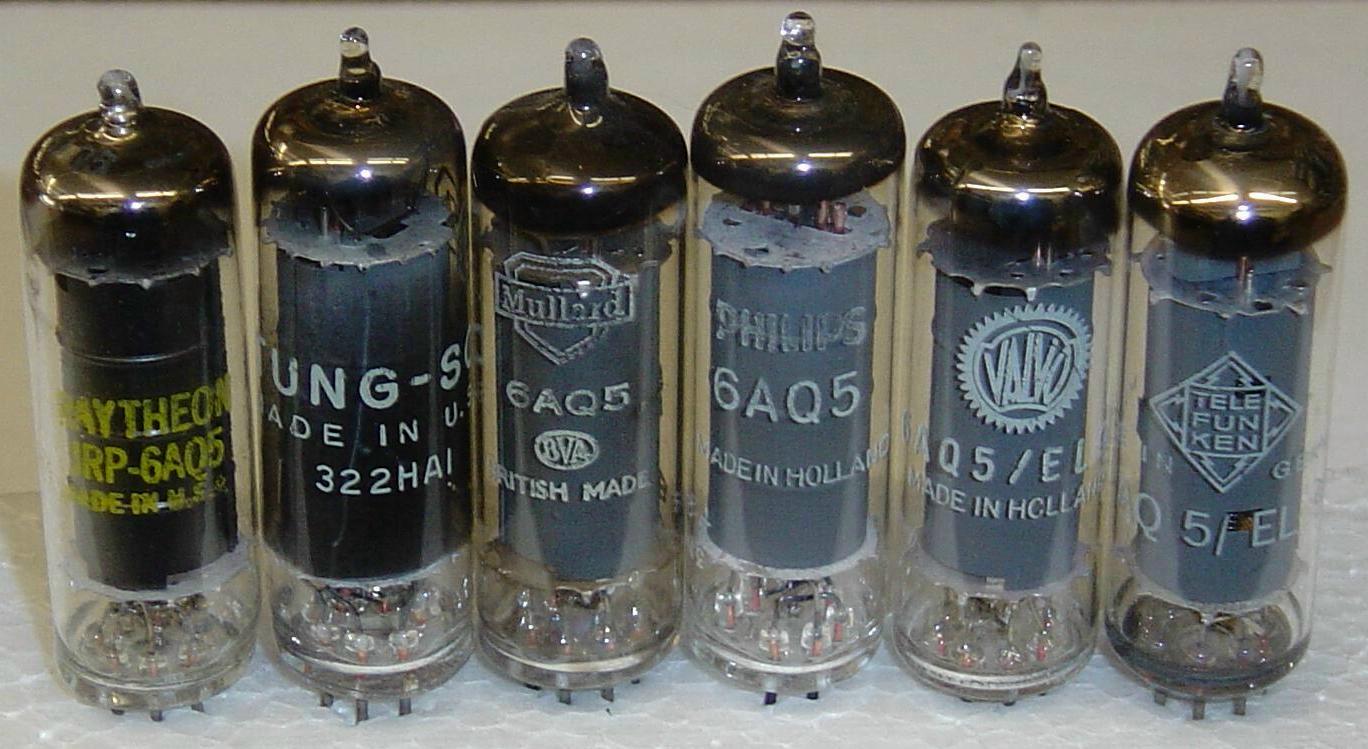
So... You've got the music skills. Do you have the sound skills? If you don't quite yet worry not my friend, we've got harmonic distortion to help fill the sonic gaps in your productions. Have you ever wondered why there is so much talk about tubes & tape machines in audio? Well, aside from the fact that they're just plain cool they also impart certain sonic characteristics on source material known as harmonic distortion. This distortion occurs as overtones of the original sound wave's frequencies and you're about to learn a whole lot more about it!


Wednesday, April 27, 2011
Craig Williams Production Tutorial Videos
 |
| Art from Craig Williams Latest Release |
Friday, November 19, 2010
Production Tip: Using Two Delays With One Send

I've decided to start a series on production & mix-down tips for producers. Each post will be a brief yet informative explanation & real world example of a mix-down or production technique. I'm hoping these can be efficient little tips you can all quickly glance at, learn, & then creatively use in your own productions. I'll start this series off with an old school delay trick. (modified for DAW's) If you use this trick tastefully it can really help to add a nice spacial touch to just about anything you're working on. Even though this trick has been used on countless records you can still make it your own especially considering we have the gift of simple automation in modern DAW's.
Friday, November 12, 2010
What is an Optical Compressor?

I'm not an electrical engineer, when people start getting super electrically geeky regarding audio I usually get lost rather quickly. The gritty important details fly over my head before I can even think about absorbing & understanding them. Keeping this in mind I'll make this simple enough so that anyone who understands basic compression can understand how an opto-compressor works on an electrical level. After all, it was the simple explanations that taught me what I know about them. Once you know how it works, you'll know more about compression in general. That way when you do go analog compressor shopping and you'll be better informed when making your audio investment.
An optical compressor (also known as a leveling amplifier) is a compressor that uses an electro optical attenuator & a photo conductive cell to monitor and control the dynamics & amplitude of processed program material (audio). Already lost? Wondering what the hell an electro optical attenuator & photo conductive cell is? Keep reading you don't need to know what they are, only what they do.
An electro optical attenuator features a light source. (in newer products these are LEDs) This light source's intensity is directly proportional to the input signal of the material you're compressing. So, as input level rises the LED shines brighter & with more intensity. Conversely, as input level drops the LED shines with less intensity. Well that's all fine and dandy but... How does a flashing light source compress audio? Here's how: The amplitude dependent light source is just one part of an optical compressor, we also need something to monitor this light source. This is where the photo conductive cell comes in. It monitors the lights source so the unit knows how loud the incoming signal is via the light's intensity. Remember, I said earlier that the intensity of the light is directly affected by the level of input signal. That's really important for understanding the larger concept.
A photo conductive cell's job is to watch over the light source and then adjust resistance based on the intensity of the light. When a louder signal is pushed through the optical compression unit the light shines brighter, the photconductive cell picks up on this brightness and in turn reduces its resistance being applied to the given signal. This then tells the amplifier to reduce it's gain thereby creating a form of compression.
Unlike other compressors that allow you to choose attack & release times, an opto's release time is program dependent. You can't choose the attack & release, they will change based off the material they are processing. (this is what makes optical compressors desirable) Since a light doesn't just shut off and instead dims as it goes out, the release time is directly proportional to the level of the incoming signal which is simply being represented as light in an opto-compressor. The same is also true for the attack times of compression when using a opto-compressor. This is why many people believe opto-compressors sound better. They're said to be more musical because their response is non-linear, just like music is. Other compressors have set response times (you adjust the attack & release) that are linear and exact. With optical compressors the response (attack & release times) is set internally. This response as I stated before is based of the properties & responsiveness and quality of the light source & photo conductive cell being used in the optical compressor.
Most Compressors you've seen also usually have a makeup gain control. We need this control because when we apply compression to something we're working on the amplitude decreases. We use makeup gain to return the material to it's previous amplitude with the compression applied. Opto-compressors do not have a makeup gain control. Their makeup gain is set and built into the circuit. For every dB above the chosen threshold the signal hits the gain will increase by just less than a dB. This can make using an optical compressor tricky because a lot of people aren't used to the gain adjusting as they adjust compression. However this also means there are less controls to adjust and it's just a matter of getting used to this new way of manipulating compression.
Hopefully this all made sense to the folks in audio layman's term land. Like I said before you don't have to know exactly how each part functions, only what each electrical component does to understand how it works. Now that you know a little bit more about optical compressors when you're ready to buy a nice analog compressor to fatten up your own sound you'll be more educated about the wider process of compression!
Best,
Nick
Wednesday, October 13, 2010
What is Dither and How to Properly Use Dither

I know everyone that produces or works with digital music has seen it. That option in the bounce menu or on a plug-in that says "Dither" or something similar with the word dither in it. Every single digital audio system utilizes dither to add noise to a signal when a higher quality digital audio file needs to be down sampled or re-quantized to a lower bit-rate.
The whole idea behind dither is actually quite simple. My goal with this article is to condense the theroy in a way that I've not yet come across on the internet. The process of dither addition is very important, the problem is people don't know about it. Furthermore, when people go to find out about it they are smacked in the face with very complicated explanations behind the practice. It seems complicated at first but I'm going to do my best to explain this as painlessly as possible.
Lets talk about why we need it first and then I'll explain exactly what it is and how to apply it to your work. Lets say we have a digital audio sample at a resolution of 24bits @ 44.1kbps. This audio sample is not an actual analog audio signal, it's merely a representation of one that has been digitally created using binary samples. A 24bit sample has a number space of around 16.7 million spaces. This basically means that there is 16.7 million samples taken from the analog audio signal per binary word to create a digital audio version of it. A 16bit sample by comparison only has 65,536 spaces in each of it's binary words. Obviously a 24bit sample is a much truer representation of the original analog audio. The higher the bit & sample rate the better quality digital audio you'll have. The problem is that high bit & sample rate files are very large in file size. A CD is a 16bit 44.1khz digital audio file this is all fine and dandy but, bad things happen when we sample down from 24bits (the sample rate we should work with when recording & mixing) to 16bits for CD and mp3 creation.
When you down sample from 24bits to 16bits you're reducing the amount of digital spaces per binary word (the binary words make up the digital waveform) by a factor of 256 to be precise. Basically the computer recalculates the digital waveform of each sample from a 24 space binary number down to a 16 space binary number whilst maintaining the same amplitude level. Can you see how this might create a problem... Imagine a bus with 30 people, no imagine all 30 of those people being told to get off the bus and get into a van. Chaos! The same thing happens when you down sample from 24bits to 16bits, there is audio chaos in the form of binary errors.
What we get in digital audio is harmonic distortion, and when you down sample without dither, harmonic distortion increases all the way up to very high level harmonics. Fundamental frequencies of the tones show up at irritating levels in the harmonic spectrum. These aren't pleasant 2nd and 3rd order music friendly harmonics, they are nasty sounding high level harmonics up into the 20th level harmonic and above. These harmonics are not musically pleasant and will ruin what was otherwise a beautiful sound. How do we prevent this from happening? We add Dither, itunes does it, (crapilly) and we can do it on our own inside of our DAW.
Dither works by randomizing all those binary word errors that result in ugly sounding high order harmonics through the addition of low level noise to the digital audio signal. The noise of dither is created by randomizing the least significant bit of each binary word sample. The least significant bit is the last number in a binary word sequence. Adding dither results in a random 1 or 0 being added to the sample (remember digital audio is simply 1's & 0's) This random addition removes the regularity of errors in the digital audio sample. If it's not regular digital errors and instead random digital errors (as it is when dither is added) we remove the harmonic distortion. Basically, the errors are no longer errors we hear as harmonics but, instead random less noticeable sounding errors. To sum it up after addition of dither the binary errors have been randomized so that we can no longer hear them. Now the errors are spread out throughout the frequency spectrum, they still exist it's just that they aren't as present and extreme as they were before. We can further mask these errors after the addition of dither through a technique called shaping.
Noise Shaping is a way of choosing where we would like to focus the dither "noise" in the frequency spectrum. If we can do this we can eliminate the harmonic distortion and keep the overall dither "noise" level low. Noise shaping adds a filter to the noise created by adding dither. This allows the noise to only live in the inaudible frequencies from 20khz up to 22khz. We can't hear this and it effectively kills the harmonic distortion while reducing the overall level of dither heard in the rest of the frequency spectrum. To be honest though, you don't need to worry about noise shaping all that much unless you're doing serious mastering. Most dither plug-ins do a fine job of noise shaping regardless of which setting you select. Just remember to add dither and some form of noise shaping any time you are re-quantizing (down-sampling) IE: 24bit/48k to 16bit/44.1k.
So now that we know how it works lets talk about how to correctly add it to our material. The best way to add dither is in mono form. If you're adding it to stereo material bounce it to mono first without dither at the same sample rate and then re-bounce the now mono material with a dither plug-in down to a lower sample rate. Here's an example: Lets say I'm in the mix and I've got a stereo sample of live drums at 24bit/48kbps that I want to add to an old 16bit/44.1kbps session. Fist I'd bounce the stereo sample to mono at 24bit/48kbps (no down-sampling, merely bouncing to split the stereo file to mono) I'd open a session at 24bit/48kbps drop the drum sample in there and add a dither plug-in such as Waves IDR. I'd select my bit rate (for this example it's 16 bits) and choose my shaping option, "normal" is usually more than adequate. Then I'd bounce the two mono files out as a stereo file and have a perfectly re-quantized sample at 16bits/44.1kbos without any harmonic distortion at all. It's that simple and it will make a difference in the overall sound of your work if you do it correctly and at the right times.
Dither is, in all reality most important during mastering when preparing material for CD & mp3 distribution but, it should also be put to use during mixing as well, like in the example above. It seems a little daunting at first but it's very important in digital audio and makes the difference between the pro's and the amateurs. Learn it, love it, use it. It's dither and it's noise that is our friend! If you're still confused and have question just shoot me an email and I'll do my best to help you out!
Best,
Nick
Tuesday, October 12, 2010
Sound System 101 For Beginners

Curious about live sound? Check out this video from 5MinLife! It's not the most visually appealing video you've ever seen but it's full of knowledge pertaining to a live sound system. Even if you're not into live sound, this video can teach quite a bit about an audio system in general. They go over nearly every part of an audio system and sum it all up in a basic yet still very informative way. Topics in the video include, but are not limited to; Mixing Consoles, Amplifiers, Speakers, Subs, Monitors, Cables Microphones, Time-Based EFX, Crossovers, DI Boxes, EQ's, Compressors and more! This basic sound reinforcement knowledge is beyond important if your serious about getting involved with audio as a producer, DJ, or engineer. I wish they would've spent time on general signal flow but, you can't always get everything you want. Regardless, this is still a fantastic video to help beginners wrap their heads around what can seem to be a very daunting subject. It's not, I promise, just check out the video and after it you'll know quite a bit more about what's going on inside of that big booth that sits in the middle of every concert you've ever been to!
Wednesday, October 6, 2010
Ableton Live Quick Tip from Nick's Tutorials Ableton Automation Tutorial

If you guys remember I did a post on Nick and his Ableton tutorial's site aptly named NicksTutorials.com back in March. His tutorials aren't your average run of the mill tutorials, all of them (even the free ones) do a fantastic job of digging deeply into Ableton Live and getting down to the nitty girtty, covering areas of the program other tutorial makers often neglect. All of his tutorials avoid useless info and when you hit play on any of Nick's videos you're off and learning within 10 seconds. This one isn't quite as in depth as some of the other videos he's made but it's still incredibly important. Automation has the ability to transform a lifeless track into a track with; varying dynamics, structure, and stereo spread if it's used correctly. In this quick tutorial from Nick on Ableton Automation, Nick goes over; Drawing, Recording, & Editing Automation. As with all of Nick's Tutorials this one gets right down to the "need to know" info right off the bat. This is certainly on the basic side of his tutorials but I'm willing to bet even you Ableton Savages might learn something new, he goes over lots of shortcuts that can save everyone a lot of time when working with automation. Check out the automation tutorial from Nick right here and be sure to visit his homepage at NicksTutorials.com to investigate everything else this Ableton Guru has to offer!
Best,
Nick
Monday, September 27, 2010
What the Bass Boost Button is actually used for and when you should use it.

It's purpose all ties into the Fletcher Munson Curve and how the human ear perceives sound. To give you a real quick run down. At lower amplitudes(volume) the human ear picks up on mid-range frequencies much better than it responds to low and high frequency information. This is because we've evolved to hear human speech which lies in the mid-range of the frequency spectrum. Communication is how we've been able to get to where we are as a species and our ear's perception of sound is just another confirmation of this thought. Conversely, at high amplitudes, we hear the mid-range with less accuracy. At high volumes the ear picks up on the low end and high end of the frequency spectrum with much more intensity than at lower volumes. Long Story short, when it's quiet you don't hear the bass and highs, when it's loud the bass and highs are so loud they drown out the mid-range. 83dB is said to be the ideal monitoring level to take advantage of the most accurate level of our ears perception. If you can't have a normal conversation over the music it's most likely over 83dB.
Now that we know a little bit more about how our ear's hear we can get back to the Bass Boost button. It's supposed to be used when you're listening to music at lower volume levels. Remember from above that at low volume levels we don't hear the low end and high end as well. When you engage the Bass Boost button on a system it gives a little EQ boost to the low and high end of the material it's processing. Now you understand why this feature is quite handy when you're playing stuff at a lower level. Our ears can then perceive a more accurate representation of the original song even when it's quiet. However, if the switch is engaged at a high volume you're really messing stuff up. Our ears already hear lows and highs better at screaming loud levels so if you have the Bass Boost button engaged you'll only be adding to the natural problem our ear's posses.
The Bass Boost button is known as many other names such as: contour, boost, hi boost, low boost and probably a billion other clever little marketing names manufactures have came up with. In the title picture you can see Ampeg has decided to call their system the ultra system and they've given you the option to increase either the highs or lows independently. Bottom line, look for it, be aware of it, and next time your raging face with your friends slapping beats loud enough to wake the neighbors don't hit that button, you don't need it, your ears are already doing that work for you!
Sunday, September 26, 2010
Solid State Logic's Duende: EQ Compression Gate Expander Tutorials

Solid State Logic has done some interesting things over the past few years to bring the legendary sound and quality of their products to a new market. A market fraught with creativity and independence, this would be where you would input your own name ______ ________. Because, chances are, if you're reading this blog you're precisely the person SSL has marketed their latest line of gear to. Gear like their X-Rack which allows users to custom build a small analog 500 series rack outfitted with any combination of SSL's dynamic processing and input modules. This is just the tip of the iceberg when it comes to what SSL manufactures that one could consider affordable. Cheap... No. The legendary sound you've heard on countless hit records since you've exited the womb... Yes! Obviously it's not "cheap" you're paying for quality, that quality is just now more affordable and more available to the public than ever before.
The Duende is mainly why we're here though. Solid State Logic released the first version of Duende in 2006, it's built on the same technology available in SSL's "C" Series Digital Console. Basically, it's a box with an SSL DSP engine that hosts SSL Plug-Ins for your DAW. It's a baby SSL that lives in a box and connects to your computer, turning your laptop into a mult-core resource eating beast! The Duende comes available in a small FireWire desktop box and also a rack sized PCIe version for you HD users. Most of you will most likely benefit from the Duende Mini. Especially laptop users considering Duende lightens the CPU load when you're using the SSL Plug-ins specific to it.

This is because of the delay introduced by the plug-in compressor on the original recorded synth track. It can only work so quickly to process the audio and spit it back out. By the time it does this and the track is sent out to be processed and recorded back to PT it is behind the other tracks in PT. This isn't really a problem in Logic and other DAW's because most have automatic delay compensation. Pro Tools LE does not though and you have to either adjust the timing by hand and move the recorded waveform back in time or find out the delay time and then add digi's delay compensation plug-in (I will do a tutorial on this process very soon) Now hopefully you see why this is a problem and can be quite a pain in the ass. Not all plug-ins create delay but most native ones do and you can check in Pro Tools by "apple" clicking on the digital scribble strip in Pro Tool's Mix Window (see picture). The Duende however introduces no latency whatsoever! Case & Point: Solid State Logic's Duende DSP powered plug-ins mean no delay compensation hassles! Now you're most certainly wondering why you're here since I've yet to show you any tutorials. Stop wondering, just one more paragraph and you'll be on your way to audio knowledge heaven.
Solid State Logic has created a series of tutorials for Duende that cover everything from basic EQ knowledge to more advanced techniques like parallel compression. While these tutorials are specific to the plug-ins available with Duende, they also have a ton of information packed into them that is useful to anyone searching for audio processing knowledge. A compressor is a compressor weather it's the stock Logic Studio Compressor or an SSL Compressor. Same goes for EQ's and other plug-ins as well. The following little bit of info comes from some of the greatest minds in the audio industry and is certainly more than worth your time. If you've got a Duende then it's just like a double whammy as you'll be trained in the recording arts (EQ, Compression, ETC.) and get a product specific tutorial for use with your software! Sorry to spit so much promotional SSL jargon at you but it's all honestly how I personally feel. The main goal of this blog is to spread awareness regarding quality gear, SSL is quality gear and I felt I needed to respectfully give the brand the attention that it deserves. Now, without further a do; I give you Solid State Logic's Duende Tutorials!
Duende Tutorial 1: Compression & Limiting
Duende Tutorial 2: Using the Gate/Expander Section
Duende Tutorial 3: Basic EQ
Duende Tutorial 4: Using the Duende Channel Side Chain
Duende Tutorial 5: Duende Bus Compressor
Duende Tutorial 6: Advanced EQ
Duende Tutorial 7: Parallel Compression

Friday, September 24, 2010
Sound Design Profile for Inception Feat: Sound Designer Richard King, Mixers: Lora Hirschberg & Gary Rizzo
"Inception" Sound for Film Profile from Michael Coleman on Vimeo.
A Producer/Engineer/DJ friend of mine by the name of Craig Williams sent me a link to watch a video last night. He didn't tell me what it was, he only mentioned that it was a really neat video and I should take a look. When I opened it, I was immediately intrigued after reading the title. I still haven't seen Inception but I know it had a multi-million dollar budget behind it which translates to dope sound design! This is a little video showing you how they created, manipulated, recorded, placed all the sounds that make up the film. It's extremely interesting and if you like film or audio this video is right up your alley. It's extremely revealing and you get an idea for the amount of work put in by these engineers to help make some of your favorite movies truly amazing. Check it out!

Thursday, September 23, 2010
Allen & Heath Xone DX ZeSoundSuite Review!

A couple weeks ago I was lucky enough to have an Allen & Heath Xone DX in my possession. Naturally I knew I'd be writing a little review up on it so I tried to master the controller as best as possible in the short time I had it. I used the Xone DX with Traktor Pro because to be honest Serato's Itch is just not appealing to me whatsoever. Itch's GUI just instantly turns me off to it. I don't care what anyone says, a solid looking pleasant GUI is beyond important. Serato is for Turn Table DJ's not Controller DJ's. GUI stands for graphical user interface by the way, it's essentially just a fancy & nerdy way of describing how the software looks on your screen. Enough of talking about the crumby bundled software, lets get down to the grit.
Allen & Heath created a special .tsi file for Traktor (4 different mappings to be exact) that allows the Xone DX to be instantly MIDI mapped to Traktor without any fuss. Once the Xone DX .tsi file is loaded you literally don't have to touch your computer again. The browsing section controls located on the Xone DX is fantastic and makes selecting and loading songs from your library a breeze, all without ever having to touch your track pad. Keep in mind the Xone DX was not built in collaboration with Native Instruments. Allen & Heath just did the MIDI mapping perfectly and certainly had Traktor Pro in mind when they designed and built the Xone DX.
I'll keep this review as short as possible whilst still remaining concise, I'll explain to you all what I really liked about the Xone DX and also the features I think they could improve on. Let's start with the sweet stuff first though, this should also tell you right off the bat my overall impression of the Xone DX. My favorite feature hands down is the build quality, this thing is built like a tank! Not much to say about this to be truthful, it's no secret the DJ MIDI Controller market is flooded with a bunch of garbage that feels like a playschool speak & spell. Allen & Heath left this idea in the dust when they built the Xone DX.
 The knobs feel absolutely beautiful and you would swear you're touching an actual analog mixer. The faders are equally as sweet, they're smooth yet feel quite solid. You don't have to worry about breaking these beasts while slamming tracks together they can surely handle it. They didn't build a pitch fader into the DX, instead you control pitch with a click able knob. I'm sure this will no doubt turn some DJ's off but if you want to be smashing 4 tracks at once together you're not beat matching anyway. Let's all be honest, the audience has no idea and you can give them 50 times the show if you're using an auto sync feature. Not to say beat matching isn't an important skill and art, it's just that it's the future now and using auto sync to create a more interesting set will take over. I could still be using a rotary telephone because it's "classic" but, I don't. Allen & Heath definitely thought about this when they built the DX and it's quite evident seeing as how the DX lacks pitch faders.
The 4 decks can be independtly controlled with a simple button that allows you to switch between two decks for each side of the DX. I had decks 1 & 3 on the left side and decks 2 & 4 on the right, the different MIDI maps Allen & Heath created allow you to set this up in any way you'd like however. Another feature I was really pleased with were the cue buttons. I honestly wish there was more of them, they bounce back fantastically and make bumping between cues to create cool jumps and loops inside of tracks incredibly easy. This is a great feature and allows you to unlock all kinds of creativity you didn't knew you had inside of you. It's a controller so as expected, the XD doesn't have nice & solid large jog wheels. But, neither does it's big brother the 4D, and the 4D is good enough for the biggest names in EDM Production & DJing so... yeah, you could say they most likely get the job done regardless. The next thing I'll touch on are the 2 groups of 4 effect knobs located at the top of the DX. The first 3 knobs are all fantastic, the 4th knob is another click-able knob and while it is very useful for selecting and browsing between effects, it doubles as the 4th MIDI knob for Traktor's EFX section and it's a tad difficult to turn quickly and efficiently unlike the first 3 knobs are. If you're familiar with Traktor you'll know this 4th knob is beyond important in the control and sync of your effects. I wish they would've added a 5th knob that was click able for browsing and left the 4 you turn for your effects all the same.


Overall though I give the Allen & Heath Xone DX 3.5 out of 5 stars. It could have a 4 if they fix that tap glitch and the only reason it can never get a 5 is because the Allen & Heath Xone 4D is the only true 5 star beast. The Xone DX is hands down the best MIDI DJ Controller/Interface available on the market for the price. It can't be beat! Don't waste your time & money with Numark garbage, save your money and buy a DX. You'll thank me later. It feels like a real analog mixer, sounds like a analog mixer and controls DJ software with the greatest of ease. Allen & Heath smashed it when they built the DX and I can't wait to see what the future holds for the DJ MIDI Controller market.

Wednesday, March 31, 2010
Nick's Tutorials: The Master Set of Ableton Live Tutorials

No... Not me, another person sharing this amazing name with me has created quite the resource for all of you Ableton geeks. Nick's Tutorials is the online world of Nick Maxwell's Ableton tutorials. Nick set out to fill the gap left by most popular tutorial videos. He saw that everything available to consumers was relatively similar and decided to start creating Ableton tutorial videos that focus on much more than just the standard basics. Nick works as a sound designer and composer who's here to help all of you to create that sound your looking for in your productions.
I discovered Nick's Tutorials while randomly geeking out and doing some searching for new things to learn. I sent him an email requesting a little bit of information about himself and his website. He was more than helpful and I really appreciate it. So in recognition of him taking the time to chat with me, show him some love by reading this post and then giving Mr. Maxwell a visit at his website dedicated to enhancing the Ableton experience for thousands of users around the world!
At Nick's Tutorials there is a wealth of video tutorials on Ableton. Most of them are free but a few subjects are available for purchase. These dive deeply into the hidden potentials of Ableton and what it truly has to offer. Take a minute and check all 4 of these tutorial videos out. You might learn something new and that my friends, is the point of it all. Below is a breakdown of what Nick's tutorials has to offer you. Nick provides video clips from the series so you can see what you're getting yourself into before you drop the cheese. Keep in mind that this series of tutorials will surely demystify Ableton but, they also give you the basic knowledge you need to take your skills onto other programs and instruments.
Nick's Ableton Live Tutorials
Sound Design in Ableton Live: Analog: This 3 hour and 40 minute tutorial video aims to answer all of your sound synthesis questions as well as serve as an in depth guide into Ableton's most powerful instrument; Analog. In addition to being introduced to the world of subtractive synthesis and Analog the video also comes with ready made instrument rack presets. Now you've got all the sounds you will learn to create before you even start the video. From nicktutorials.com; "Unlike a lot of other tutorials, these videos explain each decision in the sound design process rather than simply moving forward and assuming that you know exactly what's going on. This is not a "paint by numbers" tutorial series but rather an attempt to empower you to do this stuff on your own. I invite you to join me for a few hours and learn the amazing sonic potential of Analog!"
Sound Design in Ableton Live: Operator: This tutorial covers the world of FM synthesis and Ableton's own Operator FM Synthesizer. Nick's aiming to change the game of FM synthesis instruction, offering a practical and simple approach to exploring the world of FM Synthesis while giving you the knowledge you need to master Ableton's Operator. Nick's goal in this tutorial isn't to show you how to create specific sounds. Instead, he offers an application based approach that instructs from basic to advanced to get you on the path of creating your own sounds. The information in this tutorial will be applicable for your entire life of production and you will find yourself using the knowledge from it in multiple scenarios far beyond the world of Ableton and Operator.
Sound Design in Ableton Live: Sampling Tools: Anyone can download a sample library full of hard hitting loops and catchy leads. If you're looking to take someone's work and use it as the bulk of "your own" productions, stop reading right now. However, if you're looking to create your own sonic space and unique sound for your listener then you might want to take a look at this tutorial series. This tutorial delves deep into the realm of taking normal sounds and turning them into something quite unique and your own. Here's a breakdown from nickstutorials.com highlighting just a few of the things you will learn in this series of tutorials.
-FIND out how to transform tiny, insignificant sounds into powerful drum hits through strategic uses of layering, tuning, filtering, and envelope modulation.
-CREATE a pseudo-wavetable synthesizer out of a few tiny chunks of audio. You’ll also learn how to create rich melodic pads and lead sounds.
-DRAMATICALLY alter and improve melodic sounds through slicing and reprocessing.
-UNDERSTAND how to utilize a combination of modulating sampler and effects parameters to create evolving textures and sound beds.
-DEVELOP a clear way of dividing a large number of parameters into small, manageable groups of related sound-shaping tools.
As you can see these tutorials aren't your average beast. With these you defenitly get what you pay for. You could spend years and years combing over live as well as countless books and material on various sound design methods or you could shell out a few ducketts and have a professional who's been working in the industry be your guide to the massive world of Ableton Live. And.... Guess what??? We're not even done yet, there's still one more for me to show you guys!
Sampling & Slicing in Ableton Live: This tutorial explores the world of sampling and editing within Live. Ableton can be used in so many ways and is so massive it's easy to get lost and furthermore, quite overwhelmed. Have no fear though. Once again Nick is going to make this a lot easier on your brains and stress levels. This series explores the side of Ableton needed to create sample based productions (DJ's looking to use live, this is your new beezy) Below is a video clip from the tutorial series as well as a breakdown from Nick's website giving you a little taste of what you will be learning in this set of tutorials!
-HOW to sample audio into Ableton Live for further processing.
-HOW to interface your turntable and other audio hardware with Ableton Live.
-ESSENTIAL techniques for layering samples to create massive, custom-tailored percussive sounds, including the effective use of filter enveloping and compression to thicken your sounds.
-HOW to utilize audio clips in preparation for slicing them up.
-THE controls and feature set of Ableton's included sampling device, Simpler.
-POWERFUL methods for creating a rich, evolving chord from simple melodic stabs.
-THE controls and features of the Drum Rack device, including how to create your own Drum Rack custom presets.
-HOW to create exciting new arrangements from simple loop-playback adjustments.
-EFFICIENT methods for rearranging, modifying, and resampling your work for further processing.
As you can clearly see Nick has created quite the resource for all of you Ableton geeks. This isn't some tutorial series for those wanting to sound the same as everyone else. It's a tutorial series designed to give you the power to create your own sounds. Everyone that uses Ableton is using the same tools, it's how you use them sets you apart from the masses. These tutorials will demystify Ableton for a lot of you and in no time you too will be creating quite the musical expiernce for anyone that listens to your tracks! I also took the time to ask Nick for some information about the future of his website and tutorial ventures. If you think what he has now is great just wait, he let me in on some ideas of his for the future, I'll now pass those onto all of you! "The future definitely holds exciting things in terms of expanding out into other software and instruments. Native Instruments Absynth and Massive have both been in heavy rotation, and Renoise has been inspiring quite a bit as of late, too. I'm also planning an electronic music workflow series where I go through the production of a simple track using sound design techniques from my other series along with teaching people basic mixing and composition." For more information on Nick Maxwell and his Tutorials please visit his website at www.nickstutorials.com
Thursday, March 4, 2010
Sound on Sound's Tutorial Archive

If you don't know what Sound on Sound is, find out now... Sound on Sound Good, now you know SOS is a bitching publication offering intelligent reads for professionals and amateurs in the sound industry. Now, trip on this. SOS has archived all of their tutorials on the internet for free! You need a subscription to read the latest tutorials online but, all of the old ones are available and they will keep you plenty busy while waiting for the new articles. If you see something you have to read right away, get a subscription, you'll be glad you did. I personally go buy mine at a newsstand every month. I'm still not sure why, I waste a ton of money but, I like going out to buy my sound nerd magazines every month. Anyways, here is the link to SOS's Techniques Section. There is tons of tutorials on everything audio, as well as archived tutorials on all of the leading DAW's including; Pro Tools, Ableton, Digital Performer, Logic, Cubase, Sonar & Reason. Search SOS a bit, there is tons of articles on everything for the audiophile. Enjoy!
Saturday, February 27, 2010
The Fletcher Munson Curve & Why You Should Know About It
In the 1930's two scientists at Bell Labs named Harvey Fletcher and Wilden Munson came to the conclusion that the way humans hear specific frequencies is in fact much more complicated than anyone had previously thought. They developed the Fletcher Munson Curve, which helps us to see how frequencies are perceived. Humans do not hear the entire frequency range at the same loudness level. Furthermore; as amplitude changes, so does our ears response to the frequency spectrum. In other words certain parts of the frequency spectrum (lows, mids, highs) may seem louder to us than others, and when amplitude (volume) increases or decreases our ears hear these frequencies at different loudness levels. For example; as you turn your system louder, bass and treble sounds will increase while the mid-range frequencies will begin to get drown out. This will make more sense after we look at an Equal-Loudness Contour graph. While Fletcher & Munson were the first to create the Equal-Loudness Contour, today we use a different contour compiled from a much broader test group of subjects. The idea is still the same though, and most Equal-Loudness Contours are still refereed to as a Fletcher Munson Curves at present time.
Equal-Loudness Contour Graph

The Y axis represents Sound Pressure Level (dB SPL) or volume, in simple terms. The X Axis represents the frequency range. Phons are simply a term used to rate equal loudness. As you can see, our ears are most responsive to the middle range of the frequency spectrum. Most likely because, this is where human speech occurs in the frequency range. (score one for evolution) At lower volumes you can't hear all of the frequency range at the same level. Mids are exaggerated while bass and high frequencies are not heard as well. At higher volumes the curve begins to flatten out and we begin to hear at a flatter response than we did at lower volumes. If you're still having trouble understanding this whole idea, the following real world example may help you out. Have you ever seen the "Bass Boost" button on an amplifier or car stereo? The purpose of this button isn't to blast bass. In fact, it's actually meant to be used when listening at low volumes, and its existence can be directly contributed to the Fletcher Munson Curve. The bass boost setting is something like an EQ that amplifies low and high frequencies so we can hear them more in line with the middle range frequencies at low volumes.
If it's not obvious by now, the level your monitoring your productions or mixes at is extremely important. If you're monitoring at to low of a level (usually never a problem for most beat freaks) the mid range of the frequency spectrum is going to be louder so you're going to end up compensating for this by cranking the low and high end of your project. If you're monitoring at too loud of a level the bass is going to begin drowning out the mid range and the high end of the spectrum will be ripping through your ears. So... What's the best level to monitor at? It's widely accepted that right around 80-85 dB SPL is the best spot to work at. At this level our ear's frequency response is just about as flat as is humanly possible. The best way to ensure that you're monitoring at this level is to get a dB SPL meter (buy & return or rent one, if you're broke like me) Once you have one of these you can mark on your interface or mixer where 83 dB SPL roughly lies. That way you're always sure you're hearing everything that exists in your project.
Hopefully this whole concept makes a little more sense now. Now, go take this idea back to the lab with you. Thanks again for reading
Understanding Audio: Getting the Most Out of Your Project or Professional Recording Studio
Principles of Vibration and Sound
Equal-Loudness Contour Graph

The Y axis represents Sound Pressure Level (dB SPL) or volume, in simple terms. The X Axis represents the frequency range. Phons are simply a term used to rate equal loudness. As you can see, our ears are most responsive to the middle range of the frequency spectrum. Most likely because, this is where human speech occurs in the frequency range. (score one for evolution) At lower volumes you can't hear all of the frequency range at the same level. Mids are exaggerated while bass and high frequencies are not heard as well. At higher volumes the curve begins to flatten out and we begin to hear at a flatter response than we did at lower volumes. If you're still having trouble understanding this whole idea, the following real world example may help you out. Have you ever seen the "Bass Boost" button on an amplifier or car stereo? The purpose of this button isn't to blast bass. In fact, it's actually meant to be used when listening at low volumes, and its existence can be directly contributed to the Fletcher Munson Curve. The bass boost setting is something like an EQ that amplifies low and high frequencies so we can hear them more in line with the middle range frequencies at low volumes.
If it's not obvious by now, the level your monitoring your productions or mixes at is extremely important. If you're monitoring at to low of a level (usually never a problem for most beat freaks) the mid range of the frequency spectrum is going to be louder so you're going to end up compensating for this by cranking the low and high end of your project. If you're monitoring at too loud of a level the bass is going to begin drowning out the mid range and the high end of the spectrum will be ripping through your ears. So... What's the best level to monitor at? It's widely accepted that right around 80-85 dB SPL is the best spot to work at. At this level our ear's frequency response is just about as flat as is humanly possible. The best way to ensure that you're monitoring at this level is to get a dB SPL meter (buy & return or rent one, if you're broke like me) Once you have one of these you can mark on your interface or mixer where 83 dB SPL roughly lies. That way you're always sure you're hearing everything that exists in your project.
Hopefully this whole concept makes a little more sense now. Now, go take this idea back to the lab with you. Thanks again for reading
Understanding Audio: Getting the Most Out of Your Project or Professional Recording Studio
Principles of Vibration and Sound
Tuesday, February 16, 2010
Picking a Pair of Refrence Monitors

What's the most important part of any production? What you're producing! Therefore, what is the most important tool in your production arsenal? (Aside from your ears) Your monitors! If you can't hear what you're creating, then you can't perfect it. Having a pair of quality monitors that you know and trust will take your productions to new places. This being said, picking a set of monitors is an extremely personal decision and no amount of information I give to you here will be able to make this decision for you. You need to listen and use your ears to decide which set of monitors will be best for you and your music. However, I can give you some guidelines that might make purchasing such an important (and expensive) part of your home studio a little bit easier.
-Passive VS Active Sytems
I'm assuming that most of my readers are producers and DJ's who work out of their bedrooms. Taking this into account the whole passive VS active war is quickly won by the active systems. However, it's worth taking a look at each to understand the differences.
First and foremost a passive system requires an amplifier. I'm assuming most of you are short on: space, money and, time to learn about: ohms, watts, amplifiers, crossovers and, limiters. If you just want to make music and not worry about these things, just go with an active system, you'll thank yourself later. However, passive systems do offer some advantages. There is typically less electronic noise with passive systems because the power source (amplifier) is farther away from the drivers but, the speaker wire can be a source of interference if you're not careful. Also, you can purchase a much higher quality amplifier than you can normally get in most active systems and, you can choose an amplifier to meet your needs exactly. It's important to remember that amplifiers have their own sonic character (sound) when purchasing one be sure to listen to it powering your monitors before you buy it.
An active system on the other hand has amplifiers that are built into the cabinet that houses the drivers. No need for an external amplifier, just plug them into the master out of your mixer or interface and you’re good to go! The amplifiers (most active systems have 2, one for each end of the frequency spectrum) that are part of an active system are tuned and balanced for use with those drivers. No need to worry about getting the perfect amplifier for your system, it’s essentially already been done for you. Be careful with budget monitor systems though, often times the amplifiers in those aren’t as good as they would like you to believe.
The bottom line of this debate. With the technology today, if you spend the money, you can get an active system that rivals most passive systems for anywhere near the same price. Be weary though, the market is flooded with cheap crappy active systems that will, in the long run, just be a waste of money.
Here’s a good article from Sound on Sound that can help you understand the differences between these two even better.
Know Your Budget
Before you begin searching, you need to know how much money you have to dedicate to this purchase. This part is a little scary, quality monitors aren't cheap, so just prepare yourself. A decent pair of active near field studio monitors can usually be had for around 700 to 1,500 dollars. Find a price that you’re comfortable with spending and then research and listen to (if possible) every monitor that falls into your price range. Higher price does usually mean better components, but this isn't always the case. Only your ears and your music will be able to tell you what you really need. Remember what I said about monitors being the most important tool in your production arsenal though. If you don’t have the money to get a quality set that you’re happy with. Don’t get them! Wait it out until you can afford the system that you are happy with.
Accuracy VS Good Sound
A monitor system isn't designed to work like a hi-fi system in a home. Monitors are designed to provide as flat of frequency response as possible. In other words good monitors won't add or take away anything from your sound. Monitors aren't designed to sound "good" they are designed to sound "accurate" just because you think a monitor sounds great, doesn't mean your work will sound great on them. In fact a good monitor may make your music sound horrible. They will show you things you've never heard, and when you hear things you've never heard; you're probably going to want to take a closer look at that set of monitors. They may be your new babies.
What's Your Personal Style?
It's important to hear monitors with your music before buying anything. I recommend taking a CD to your local music shop with a few tracks that you've created and know really well. You might also want to throw some of your favorite professional tracks on that CD too so that you can hear those mixes from your perspective monitors as well. If you produce hip-hop or dance music (which I’m assuming most of you do) you obviously really want to concentrate on bass. Look for monitors with larger low end drivers. (subs) And you might even want to consider looking at a 2.1 system (2 monitors and a subwoofer) Blue Sky makes a very nice affordable one. This isn't necessary but hip-hop and dance music is created to be felt, if you don't have a sub, or monitors with good low end response you may find yourself pumping your monitors to get that bass your searching for. Pushing any sound system to the limit will cause it to distort what we're hearing and this is obviously something that we don't want. While we're on this low end subject, it's worth mentioning that Mackie monitors are notorious for their low end coloration (addition of low end information) I've worked with multiple Mackie setups and can attest to this myself. While they may "thump", your track won't thump like they do on Mackies when you listen to it on another system. Not to say Mackies are a bad choice, it's just something to remember when you hear them. They sound deeper because, they are, not because they're better than other systems. You will notice all these difference as you listen to more and more monitors. Only you will be able to decided which ones you really like.
A Few Brands Worth Checking Out
Adams: Their A7 monitors are unbelievable (just ask trees :D)
Genelec: If you've got the money... Check em out
Dynaudio: Never actual heard them, however I've only heard good things.
Blue Sky: Another personal favorite of mine, however not the most durable of monitor systems.
Tannoy: They've been building speakers since 1926, they know what's up.
KRK: A good "bedroom" monitor; simple, rough, and fairly accurate.
All this being said I hope that this post can help you in your quest to perfect the sound that you're all searching for. There are tons of resources that can help you pick out a pair of monitors, and the research on your part shouldn't stop here. Monitors are an expensive investment and I recommend doing as much homework as possible before you buy a set. Remember what matters: YOUR EARS! Listen, listen, listen to every set you can. Once you start listening you will begin to hear the subtle differences. When you've found some your comfortable with take them home and rock out with whatever it is you rock out with! Good Luck! If you have any questions you can always contact me at: nlucini@me.com or click the call me widget at the bottom of the sidebar.
Subscribe to:
Posts (Atom)